Tech Report - Challenging assumptions
By Lennard Zinn
VeloNews technical writer
Filed: January 29, 2008
The first day of the second annual Serotta Science of Cycling Symposium offered participants some welcome opportunities to take on a few sacred cows of the sport.
Among those taking jabs were gored by professors Maury Hull, Ph.D. of UC Davis and Jim Martin, Ph.D. of the University of Utah. The gored cows were partially resurrected by Andy Pruitt, Ed.D. of the Boulder Center for Sports Medicine, and Katrina Vogel, MS, DPT, a Seattle physical therapist, and perhaps by Jeff Broker, Ph.D. of the University of Colorado/Colorado Springs. Conrad Earnest, Ph.D., the director of the Exercise Testing Core at the Pennington Biomedical Research Center in Baton Rouge, Louisiana, gave a compelling synopsis of both the history of testing of Tour de France cyclists and the history of the Tour itself.
It was a high-powered panel in Boulder
Hull led off with a discussion of his Shimano-funded research into foot position pedaling mechanics. He studied twisting moments and bending moments about the knee during pedaling. Using sophisticated setups in the Biomechanical Engineering in Sports Laboratory and the Orthopedics Biomechanics Laboratory at UC Davis, Hull studied the effects of floating pedals and canting of the foot on the rotational and lateral moments of the knee and demonstrated that minimizing those moments is desirable for pedaling efficiency and for injury prevention.
Using the knee of a cadaver hooked up to tension devices to pull on muscles and tendons while the fixture applies internal rotational and varus (i.e., outward, or bowlegged) bending torques on the tibia, he measured pressure under the kneecap. He showed that together, internal rotational and varus bending torques on the tibia greatly increase the pressure under the kneecap and hence increase the likelihood of Patello Femoral Pain Syndrome, a common cycling knee injury.
He also measured cyclists pedaling on an ergometer with EMG electodes hooked up to show activity of the vastus medialis oblique (VMO), vastus lateralis (VL), and tensor fascialatis (TFL) muscles. These three muscles apply tension on the iliotibial band, inflammation of which is another common cycling knee injury.
The upshot of his research skewered two rather sacred beliefs of cycling fitters. One of his conclusions is that floating pedals do not reduce the rotational and lateral moments about the knee and are hence of no use in preventing knee injuries. The other conclusion is that 10 degrees of valgus canting (i.e., tipping the foot inward, or knock-kneed), reduced rotational and lateral moments about the knee and are therefore beneficial in preventing knee injuries.
Pruitt, director of the Boulder Center for Sports Medicine spoke from a clinical perspective about cycling knee injuries and what he has learned in a quarter of a century of treating them. Interestingly, his clinical findings were almost diametrically opposed to the lab conclusions of Hull.
Pruitt works as an exclusive design consultant to Specialized Bicycles on its Body Geometry products, and he notes that while the knee is the No.1 injury problem in cycling, cycling is the No.1 recommended therapy for knee injuries. To him, the knee is the victim, and the hip and ankle are the culprits.
He has found that floating pedals, both in rotational and translational freedom, have greatly reduced the incidence of ilio-tibial-band knee injuries, which became "epidemic" in the early 1980s with the introduction of clipless pedals without float. He showed gruesome photos of the surgery he helped pioneer at that time of cutting an oval hole in the IT band to reduce its tension and hence its irritation when rubbing along the side of the knee during pedaling.
Pruitt also reported a reduction in a variety of knee injuries as well as an increase in cycling efficiency by canting feet outward (varus canting); that's also the opposite of Hull's research findings. The Specialized Body Geometry shoes that are his brainchild have this feature built into the sole. They also have insoles with medial (i.e., longitudinal) arch support as well as metatarsal arch support. While he did not address the latter in his talk, he did discuss how the collapsing of the medial arch, while it serves a purpose in walking by storing energy to be given back when springing off of the foot, has no use in the cycling downstroke. "You don't want to store energy during the downstroke," he said, "you want to deliver it."
Martin skewered sacred cows about crank length, pedaling technique and rider positioning. We were forewarned, though, as he said at the outset that many of us would find his conclusions "irritating."
His studies of 16 bike racers of various heights doing maximal sprint power tests of under four seconds duration on cranks of 120, 145, 170, 195, and 220mm showed no statistical difference between crank lengths. Seat height to the pedal was maintained throughout, but fore-aft saddle position and handlebar height were not readjusted with crank length changes, despite variations with crank length of pedal-to-knee relationship and saddle-to-bar drop. This also led to Martin's assertion that he could see no point to positioning the knee over the pedal spindle.
Further Martin tests showed no statistical relationship between metabolic cost and either pedaling rate (RPM) or crank length, using nine trained cyclists riding 145, 170 and 195mm cranks who pedaled at 30-, 60-, and 90 percent of their lactate threshold at 40, 60, 80 and 100 RPM. On the contrary, power output and pedal speed (pedaling rate times crank length), accounted for over 98 percent of the variation in metabolic cost.
In another test, Martin had 10 racers perform a 30-second maximal sprint on 120mm and 220mm cranks at 135RPM for the 120mm and 109RPM for the 220mm. he found that, while the rate of fatigue was less for longer cranks, the fatigue per revolution was identical. This led him to suggest that track sprinters, rather than spinning at high RPM, should select the gear at or just below the one at which they produce maximum power output. The higher gear, as fatigue per revolution would be constant, would get the rider to the finish sooner, as fatigue would take more time to set in.
Finally, Martin's studies of pedaling technique indicated that regional cyclists had "better" pedaling mechanics than elite cyclists. It indicated that elite riders pull up less on the pedals on the backstroke and push down harder on the downstroke.
By studying 13 trained cyclists and 35 fit athletes who did not own bicycles, he also showed that non-cyclists, who started out lower on the first day, produced higher power outputs by the 4th day than trained cyclists. They also hit their maximum power at a higher RPM than the cyclists. The total time to learn to produce more power by the non-cyclists was three days and a total of 36 seconds of hard pedaling! This seemed to dispel the ideas that cycling adaptation takes time, that pedaling technique refined over time is important, particularly to learn to pedal efficiently at high RPM, and that avoiding "working against yourself" on the backstroke (revealed in graphs showing a net negative torque past bottom dead center) is useful.
Martin says that you are then left with two things to go faster. Hard training and good nutrition, hydration and recovery are the keys to maximizing the power you can produce. And reducing aero drag and reducing braking are some ways you can minimize the power you must produce. That's it. Simple.
Earnest, in his "105 Years of Cycling, Science and Legend - Lessons from the Tour de France" talk, gave audiences glimpses into the history of sports science as well as into the history of the Tour itself. He related study after study over a century from which we have gleaned much of what we know about cycling and training for it. He drew gasps, for instance, with his photos of a cyclist riding with the first "portable" heart rate monitor. The thing was strapped to his back, weighed 75 pounds, and was the size of a large backpack!
The Pennington Biomedical Research Center focuses on studying diabetes and other overweight-related diseases and syndromes. Noting that, "there is no nice thing about cycling in Baton Rouge," after originally starting his sentence with, the "nice thing about cycling in Baton Rouge," Earnest pointed out that there is only one safe road to ride on, and it is flat. This has led to a proliferation of cyclists who focus on time trialing. He also pointed out that Louisiana consistently comes in second to only Mississippi for having the most obese population in the USA. These two characteristic populations has made it an ideal place to stuffy obesity vs. time trial performance. The resulting study showed that, in a flat time trial, taking 3kg of mass off of the body results in almost twice as much time reduction as removing 3kg from the bike. As the Tour's pivotal stages are generally either time trials or mountain stages, this is an important finding.
And looking at mountain stages, another interesting study was the climb of René Pottier in 1905 up the Grand Ballon d'Alsace. On a single-speed fixed-gear bike, he was the first to reach the top of a mountain in the Tour by not only being the only one to make it up without dismounting, but also by pedaling up it at an astounding 20kph. Earnest's research shows that ride to be an amazing accomplishment even by today's standards, despite the fact that he punctured on the way down, thus losing the stage, and that he withdrew the following day due to tendonitis. Pottier apparently put out an average of 370-390 watts up that entire climb. No wonder he came back to dominate the next year's Tour, winning five stages. Sadly, he committed suicide in 1907, hanging himself from a bikehook.
Other studies focused on the Banesto team in the Vuelta and the Tour, thanks to Earnest's close collaboration with the lead researcher in those studies. One interesting one showed that, over the three weeks of the Tour or the Vuelta, a rider's maximum achievable heart rate drops. Another showed that a wide range of cadences can work for a rider. It demonstrated no difference between 80 and 100RPM in oxygen uptake at a certain power output and a small dropoff at 60RPM, but that adaptation takes time is required for maximum efficiency, and could probably erase this difference as well. A nutrition study indicated that performance is improved by taking in fructose and other high-molecular-weight sugars, rather than simple (low-molecular-weight) sugars.
Vogel, like Pruitt, discussed the value to the majority of cyclists of varus foot canting on the pedals and pointed out a number of clinical cases. She discussed the rarity of valgus canting as an indicated therapy and the possible, albeit dangerous due to likelihood of low-back injury, of "spring loading" the tendons and ligaments of the hip through valgus canting. She noted the theoretical opportunity to slingshot energy from the one side of the hip to the other this way.
Broker spoke at the same time about cycling biomechanics, and as pedaling mechanics was the focus of much of his work while working for the U.S. Olympic Committee, it would have been interesting to see how it squared with Martin's surprising revelations. But alas, I could only be in one place at a time.
The symposium continues tomorrow and Wednesday. Tomorrow I will also meet with Active-Spoke, a company whose product is a little weight with a spring attached to it. The weight goes on a spoke and moves more rotating mass out to the edge of the wheel when it is spinning fast. When the wheel is spinning slowly, the springs bring the weights back to the center of the hub.
Wednesday, January 30, 2008
Of interest to the nerdy, the injury-prone, and the fans of P.T. Barnum
http://velonews.com/tech/report/articles/13978.0.html
Tuesday, January 29, 2008
Snow'd In..
Well, not really. In fact, I should really be riding in this weather.
Except my new bike isn't ready.
I keep getting side tracked.
One moment I'm turning a 15mm wrench. The Spicer's last nut is torqued to BMX tight. Then I see my rim cracking. Don't want to be a Mander. Next I'm in Ty's shop looking at rims, Then I've got his last Ambrosio Excellence but my spokes are too short, then they're too long, then they're just right. ..and I build the wheel for the second time.
I'm out on the Cunny, in the West end, thinking about drift physics while my front fork packs with snow.
This is starting to sound like a dream.
Then I'm in Dream. Darren actually hooks me up with a cog.
Then I'm in Dream. Darren actually hooks me up with rim tape.
Now I'm back at the wheel. These bearings are shit.
8000km on a set of Nachis. I'm going to try running a little less chain tension to see if i can't get more life out of a set of rears.
I can't even pound them out they're so corroded. Eventually I coax the shaft and bearings out with some concrete blocks and wood. (wrenchin dirty)
Did I talk about the axle before?
I'm pretty sure I did.
Well. If I didn't go into enough detail then. I will now.
Between the bearing surface and shoulder, there is a little trough. This allows any debris/grease during bearing installation to have a place to go. Its also a really pretty way of distributing stress. I also really enjoy the nice slope from the shoulder to the unused centre section of the axle. The real point is, having it out prompted me to measure and model it.

The helical swept cut of the 10x1mm threads was problematic, and I now understand why there is a 'Cosmetic Thread' feature. The rebuild time is getting out of hand. I won't even get into how the COSMOSXpress analysis handles all those faces. In fact, I just tried to simulate a 200lb loading of the axle, and its still busy computing.
Ah well.. I guess this gives me time to put my hub back together and tension up a wheel. Maybe I'll even be able to ride the Spicer before the snow melts.
Tuesday, January 22, 2008


Tuesday, January 15, 2008
How to replace your Cartridge Bearings
In this post I'm going to detail the steps necessary to replace the cartridge bearings in your sealed hub. If you don't have sealed bearings, this doesn't apply to you.
How do you know if your cartridge bearings need replacement?
Well, for one, they will not spin as well and you will hear them. Secondly, they may develop side to side play even with the lock nuts tight. Thirdly, the seal may be wrecked, and they might be dribbling rust down your pretty high flange hub.
Supplies needed:
-2x new bearings (I'm using Nachi 6000RS2)
-Soft faced mallet
-Block of wood with 11mm hole drilled in it
-Cone nut wrenches (My hubs take 14mm and 17mm, yours may differ)
-Paper towel or rag
->500grit sandpaper or emery cloth
-Grease
Procedure:
1)Using the cone nut wrenches, undo the two lock nuts on each side of the hub. I hesitate to say 'cone nuts' here because the inner one is NOT cone shaped like on a loose ball hub. It simply shoulders up to the inner race of the cartridge bearing, stopping it from moving laterally.

2)Once all four lock nuts have been removed from the hub, there is nothing holding the axle and bearings in place other than friction. You may now strike the end of the axle with the soft faced mallet in order to coax it out the other side. Be sure to strike the axle dead on the end, so that the force pushes the bearing straight out. What should happen, is that the shoulder on the axle should push the inner race of one bearing outwards. If the bearings are not COMPLETELY destroyed, the rest of the bearing will come out along with it.
(If this blows the bearing apart, don't worry we'll cover that scenario in a second)
3)At this point you should have the axle separated from the hub shell, with one bearing on it. You SHOULD be able to pull the bearing off the axle at this point.
(If not, insert the axle into the block of wood, and tap the bearing off)
4)Reinsert the axle and flip the hub over. Now use the mallet to strike the end of the axle and tap out the cartridge bearing on the other side.
5)If any of your bearings have blown apart, you will have a serious mess on your hands. Skip this step if your bearing came out in tact. You then need to use a flathead screwdriver from inside the hub shell, to get the outer race out. This may be difficult, but try to catch the screwdriver tip on the inner edge of the outer bearing race before tapping. Then work your way around the circumference of the outer race, coaxing it from the hub shell.
6)You should now be left with these unhappy little fellows:

Look at how gross that one on the left is!
7)Its time to clean things up. I was able to just wipe the rust off my axle with a rag, but the hub shell wasn't so easy. You wouldn't think that rust would adhere to aluminum that well, but mine was pretty stuck on.

8)Here I've used some 600grit sandpaper to clean the outer race shoulder of the hub shell. This is a step that not a lot of bike shops will spend time on, but I like to know that my bearing is not butted up against rust.

9)Lets take a closer look at the axle:

This is a thing of beauty. What's so interesting about it you ask?

Its made of hollow hardened stainless steel, with shoulders to hold the bearings the correct distance apart. Also, its machined to a very precise tolerance. The bearing seat is exactly 9.96mm in diameter.

The inner race of the bearing is exactly 10.00mm in diameter. This is on purpose, and is the reason why you were able to pull the bearings from the axle. If this tolerance was any tighter than 4 one hundredths of a millimeter, you would have had a much tougher time removing that bearing in step 3.
10)Its time to put it all back together. I like to apply a small coat of grease to the bearing seats in the hub shell, and the bearing seat on the axle. This is just a small step in preventing rust from adhering to them in the future, and it eases the installation of the new bearing.

11)The most important thing to remember when installing cartridge bearings, is to apply the force to the race you are trying to seat.
What I mean, is that if you are pressing the bearing into the hub shell, the OUTER race is the one that has friction, so you should apply the force there. If you apply the force to the INNER race, you can prematurely damage the bearing through lateral loading.
12)What I do to seat the first bearing, is use a second bearing (old or new) butted up against the outer race.

This allows me to lightly tap the bearing into place accurately. Be sure to take your time, working your way around the circumference of the bearing so that it goes in straight. You should rotate the hub around and eyeball it as you go so that you know it is not seating crooked. You will know when it is seated all the way by the sound it makes as you tap it. The sound will turn from a dull 'thud' to a 'ping' as the spokes resonate more once it has seated.
13) Now flip the hub over and insert the axle.

14)This is where the block of wood comes in really handy. You can now seat the second bearing in place by hand to align it, then use the mallet and block to drive it in place. Once again, take your time and make sure it goes in straight. Once the bearing is MOST of the way in place, you will need to add another bearing onto the axle, in order to drive the outer race all the way down on the bearing seat of the hub shell.

15)We're almost done. The axle and bearings are now friction fit together, and you can try turning the hub in your hands. The new bearings should feel ultra smooth compared to the crap you pulled out of there. The last step is to tighen the lock nuts into place. If you've driven the bearings in all the way with the mallet, the inner lock nut should lock into place without moving the bearing.
(Think back to Step 11, where I said that the force should be applied to the OUTER race. Its not the end of the world if the inner lock nut pushes the bearing in further, but its not exactly great for the bearing.)

Tightening the inner lock nut should NOT stop the bearing from turning smoothly on a hub that takes standard 6000 series bearings
16)The very last step is to put the outer lock nuts on, and tighten them in place. They don't have to be super tight, just snug. Thats it! Now get out for a ride and enjoy your newly serviced hub =D
If you enjoyed this How To, found it helpful, or think I'm a fucking idiot and I'm doing it wrong, please leave a comment. If you want to read another interesting DIY, check out what Simon is doing to keep his turtles cozy.
Thursday, January 10, 2008
Bike Swappin'
Since Lyle broke the Bianchi, he has been riding my Sekine. As he was looking for a new frameset and wanted to ride track geometry on the street, it was a no-brainer that he try out my KHS as well. Here are some photos from Wednesday's bike swap breakfast. It's interesting to see how much longer Lyle's legs are: 7cm to be exact.
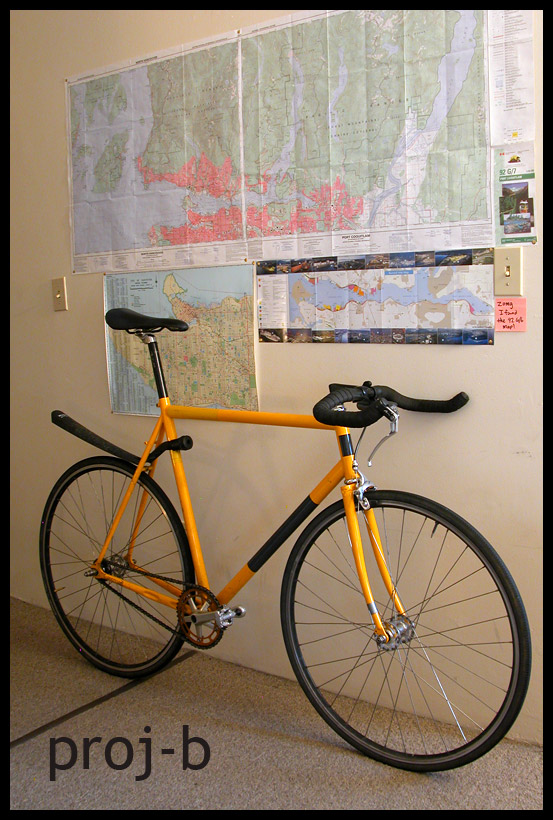
2005 KHS Flite 100, 57cm square, Reynolds 520. This was the "Ugly-look Winter KHS" that I took to the 2008 6 Days of Burnaby. Race winner; clavicle breaker.

Lyle needed only put 30km on this setup before ordering the identical frameset from Spicer. Fortunately, the SLUT seat post is long enough for him. I'm looking forward to dropping the post and trying out the bullhorns and Sora-Ace caliper.
1981 Sekine, 56cm square, Tange #2. 1cm shorter in the seat tube than Lyle's broken Bianchi. This is what Nick T. would call a "proper gentleman's bike," as it exudes class.
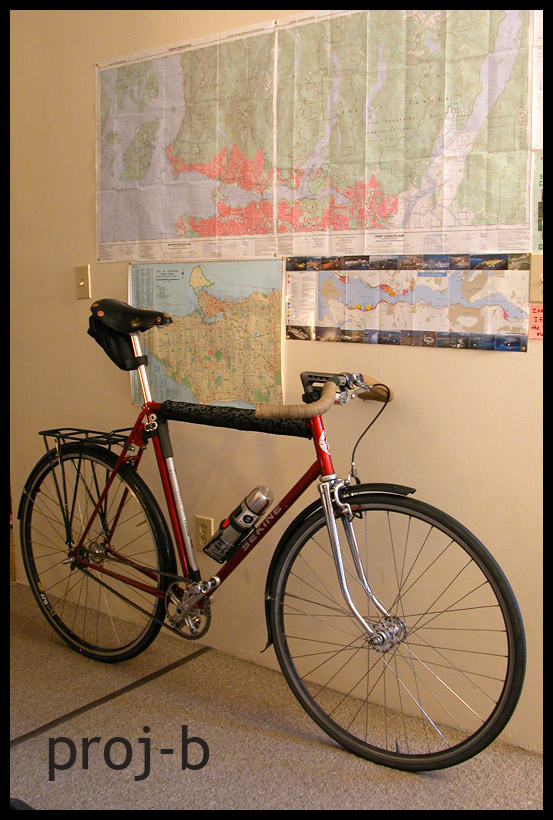
I wanted to try this look on the Sekine ever since I stole its original bar/stem/saddle on the Marinoni. I apologize about the blue tires; they look horrible, but are the best tires I currently own in terms of traction. In fact, I think Lyle's cockpit just doesn't look as good with 7cm less post. After 30km on this setup, I think I'll keep it this way for a bit. Very upright and gentlemanly.

2005 KHS Flite 100, 57cm square, Reynolds 520. This was the "Ugly-look Winter KHS" that I took to the 2008 6 Days of Burnaby. Race winner; clavicle breaker.
Lyle needed only put 30km on this setup before ordering the identical frameset from Spicer. Fortunately, the SLUT seat post is long enough for him. I'm looking forward to dropping the post and trying out the bullhorns and Sora-Ace caliper.
1981 Sekine, 56cm square, Tange #2. 1cm shorter in the seat tube than Lyle's broken Bianchi. This is what Nick T. would call a "proper gentleman's bike," as it exudes class.
I wanted to try this look on the Sekine ever since I stole its original bar/stem/saddle on the Marinoni. I apologize about the blue tires; they look horrible, but are the best tires I currently own in terms of traction. In fact, I think Lyle's cockpit just doesn't look as good with 7cm less post. After 30km on this setup, I think I'll keep it this way for a bit. Very upright and gentlemanly.
Monday, January 07, 2008
6 Day Report
Well. It turns out I'm an idiot and I should have registered for the 'New Racers' category, because just one night of racing was NOT enough!
Projekto Bee sideshow action was in full swing at the last night of the Burnaby 6 Day. We cleaned up again. Morgan took the Scratch race, I took the Pursuit, and N1ck actually got on the track!
I couldn't believe the turnout there either. The stands and beer garden were to capacity, and half of east van was standing in the infield. The Australian pursuit doesn't feel nearly as lonely when there are a few dozen people cheering you on.
Word to teamwork. We're rich with new tires, swag, cash and good times.
Thanks for the great pictures Brandon and Travis and Rob McMurtry:

If I've learned anything in the past week, its that you shouldn't race on a rolled ankle, because you'll win and it will make you think that things like sprinting on tiles and riding with injuries is cool.
Then you'll sit around at home staring at your track bike, and that's not cool.
One last good thing about the night that I should mention, is that I got to meet the Cunny's original owner and design input guy. He just walked up to me and mentioned how he use to own the bike. Tim Kilcullen (1999 national pursuit champion) and I had a conversation about the lug detailing and clearance on my bike. It was freaking great!
I even confessed how I had been streeting the bike, and he was just stoked it was being used. He even complemented me on how it was built up.
I've since returned the bike to street mode, and am patiently waiting for the swelling to go down so I can ride again.
Projekto Bee sideshow action was in full swing at the last night of the Burnaby 6 Day. We cleaned up again. Morgan took the Scratch race, I took the Pursuit, and N1ck actually got on the track!
I couldn't believe the turnout there either. The stands and beer garden were to capacity, and half of east van was standing in the infield. The Australian pursuit doesn't feel nearly as lonely when there are a few dozen people cheering you on.
Word to teamwork. We're rich with new tires, swag, cash and good times.
Thanks for the great pictures Brandon and Travis and Rob McMurtry:
If I've learned anything in the past week, its that you shouldn't race on a rolled ankle, because you'll win and it will make you think that things like sprinting on tiles and riding with injuries is cool.
Then you'll sit around at home staring at your track bike, and that's not cool.
One last good thing about the night that I should mention, is that I got to meet the Cunny's original owner and design input guy. He just walked up to me and mentioned how he use to own the bike. Tim Kilcullen (1999 national pursuit champion) and I had a conversation about the lug detailing and clearance on my bike. It was freaking great!
I even confessed how I had been streeting the bike, and he was just stoked it was being used. He even complemented me on how it was built up.
I've since returned the bike to street mode, and am patiently waiting for the swelling to go down so I can ride again.
More fun from the CL
If you read the CL like I do, you probably don't click on every post. In case you don't click things that say "BMX," here's one worth laughing at. This guy might be able to pay me $40 to take the thing away. Good old Guildford.


Powerlite Chaos BMX frame and fork - $40
4130 chomoly Powerlite Chaos Frame and Fork, s/n WYJ8J00223. Chrome was flaking so I was sandblasting it, but I ran out of time so it's about 50% finished, just needs the stickers peeled off, and a coat of red paint, or powder coat would look nice, whatever colour works for you it's gonna look sweet! Nice welds, a strong bike! Only $40 obo! Email quick~......
If you need basic rims, bars, cranks, stem, seat etc to go with it, I can sell you almost all you need to get it going as a rider, you'd just need to build it.
Sunday, January 06, 2008
Wednesday, January 02, 2008
Simpsons already did it.
Although Saturday's open-class carnage at the Burnaby Velodrome Six-Day is fast approaching, we regret to announce that we've been beaten to the coveted drome-poach by a bunch of kids from France:
street bmx video from monsieurlagarce on Vimeo
street bmx video from monsieurlagarce on Vimeo
Subscribe to:
Posts (Atom)
