Wednesday, October 29, 2008

Impending Doom

Three days off. The point of this race is to come out with your friends and have a good time. Be prepared to stay the entire evening, including the show at the Cobalt. Satan gives the race 5 out of 5 pentagrams.


Lyle already posted it, but I'm watching the race vid again and so are you now. 


In other news, Chunks got a good number of people out to race and heckle at a themed Hey Fixie, the National Avenue Sprints. It wasn't too cold. I raced Travis Jutson twice and we both won one. He was riding 77" while I had my usual 71". The track was around 200m, coincidentally the same length as the Burnaby Velodrome.


Friday, October 24, 2008

I may have forgot to mention..

Tomorrow is Black Label's 6th annual BIKE KILL!!! \m/


Needless to say, I'm taking the BMX, and wearing protection.

New Wheel Day!

Gold medals for everyone!

I'm finally off that wobbly, S-bent, elliptical, spongey Ambrosio Excellence. Wow. What a misnomer. Thanks to Chombo for the Vee and Jam Pony bikes for hooking up the spokes.

Such a nice afternoon to build a wheel. I cued up the fittingly ridiculous 'Fast and the Furious: Tokyo Drift' and grabbed one of my RatPack Hustle won beers, and set to work.

The first part, unwinding that damn Ambrosio was the hardest part. My hand hurt after this:


The old build was so tight that the spokes had practically fused together at the crossings.

I cleaned up my hub a bit and inspected the spoke holes. This would be the third wheel I've built with it. Some of the holes are stretched a bit in the direction of their spokes, but that's nothing to be concerned about. I think it was Jobst Brandt who said that if relacing a hub, you should always do it in the same direction, or the new stresses may be an issue and you would risk flange failure. I'm not gonna argue with Jobst.


One thing worth mentioning is how awesome it is to build a wheel while leaving your cogs on it! The spokes cleared the 14 and 15 tooth DA cogs with ease. I think the last time I built on this hub it had 15/16 cogs and was much more difficult.

The hot headed American gaijin kept getting himself into trouble with the young Yakuza hopefuls, as I relaxed, chuckled and brought the new rim into tension. Tonally, I knew this would be a clean build, without so much as glancing at the TS-2's caliper. It rings out beautifully.


..and here we are, all done. Bozoku style. I'm ready for some pedestrian clearing Dorifto chase scenes.

Thursday, October 23, 2008

Nice Commercial

In no way does Proj-B endorse Hutchinson tires. In fact, I was unimpressed with the last Hutchinson I ran. I just thought the ad showed the pretty side of riding around NYC. It features Alfred Bobe Jr. and some girl on a Coasting equipped bike. Have a watch:

Seymour bomb 08

Thanks to Billy the Kid for shooting/editing this.


Zoobomb Expeditionary Force from Billy Meiners on Vimeo.

At 2:45 you can see Morgan skidding on my Hookwormz!

Tuesday, October 21, 2008

Hoang Tran on Subrosa

Hoang Tran here with some Randy Taylor shit. A worthy minute and a half.

Sunday, October 19, 2008

Trials

The Come Up kids may be hating on this vid, but I LOVE it.
Trials hops are pretty tough, and to combine them with street style is freakin ridiculous!
If this is the future of Trials, I'm stoked.

Danny Macaskill : Next level street trials from brainchild-films on Vimeo.

Saturday, October 18, 2008

Power of the bike bell


Cute.
Though, today, even a bell didn't stop people from walking into me on the Brooklyn bridge.

Thursday, October 16, 2008

Thoughts on laser cut dropouts..

Recently, while visiting the Brooklyn Machine Works shop, I had a look at a variety of Laser cut dropouts. I can't get into detail about the the designs I saw there, because I don't have pictures to illustrate them, and there was just TOO much awesomeness going on there to be described in one post.

Laser Cutting is the general technology used to churn out dropout after dropout for the majority of today's track and BMX frames. Obvious exceptions to this are the forged and machined examples found on some high end bicycles. For the most part however, the single thickness dropouts found on your track bike, were cut with a CNC driven laser.

Plasma cutting is another viable option, and may have been used in the past. However, the width of beam is slightly larger than with a laser, and therefore accuracy is less. With the ever decreasing price of laser cutting technology, its almost easy for designers to get carried away.

(BMW actually doesn't do any laser cutting in house. They do their designs in AutoCAD and contract another metal shop to do that)


I'm not going to name names, but here we have excessive laser cutting. Its as though the designer wanted some swoopy crescents to dress up his dropouts. A napkin was marked up with a fine tipped sharpie, and sent overseas. The factory reviewed said napkin, said "Sure thing chief!" and away they went with the CAM program. Never mind that the actual crescent shapes have no flow, and subsequently do nothing to create an air of classiness. Now, I don't personally know how much this will affect the strength of the design. I just get this vibe that its a bad idea.

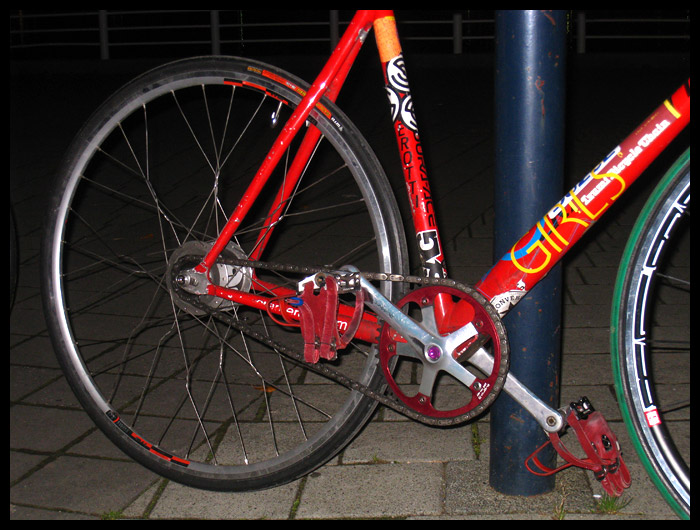
A city ridden bicycle is subject to stresses many times greater than the riders weight when road imperfections are encountered. The axle pushes UP on the dropout with ridiculous amounts of force. These stresses occur at high frequency, every ride. These are the sort of forces that (over time) lead to dropout weldment failures, or similarly seat stay/seat tube junction failures.

A stress riser is essentially where localized forces can overcome the shear strength of a material. And nothing localizes forces more than sharp angles. The stress concentration factor goes up exponentially as the radius of a cut approaches zero. The idea of adding 8 tiny-radius-acute-angle cuts to a small piece of metal that is undergoing high frequency shear forces from the axle just seems like its ASKING to test the elastic modulus of the steel being used.

Just looking at that picture is bothering me enough that I have to model it. 
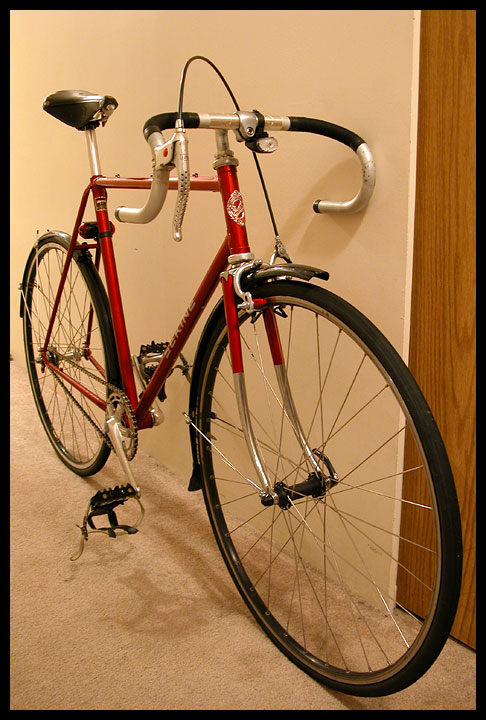
I MUST know just how much these cuts affect the strength of the part!

Here I'm starting by importing the photo of the unnamed bicycle dropout into a modeling program, rotating it and scaling it correctly. Then I just draw the existing dropout shape in a 2D sketch:


Now, lets suppress the photo and extrude the basic dropout. Shall we assume it's 5mm thick?


Looks decent.

Okay, here I'm just copying the random swoopy crescent shaped cuts in our unnamed dropout. Looking closely, there is only one straight line. The absolute randomness of these cuts really makes my brow furrow.


...and the final cutout:


Looks horrible doesn't it?
Anyways, on to the testing.

The simplest way to do this, will be to anchor the two faces where the dropout meets the rest of the frame. Next I'm going to put a very slight axle groove in the top of the dropout so that the forces of the axle can REALLY be localized. (as opposed to applying force along the entire upper edge of the dropout) Remember, I'm trying to simulate an axle impacting this thing.


Okay, lets assume our Proj-B test rider weighs about 190lbs. If he hits an object (like a wheel swallowing pothole in the South Bronx) then the force on the axle is going to be several times his mass. We don't actually need to use any particular value here, because I'm going to use the same value to test the dropout with and without the fancy cutouts, but lets assume that the force is twice the rider's weight, thats 1690N being applied at the upper edge of the dropout

This program has a handy stress analysis tool that allows one to calculate the Factor of Safety (FOS) of a part. Simply put the FOS is the Material's yield strength divided by the equivalent stress at a point.

-An FOS less than 1.0 at a location indicates that the material at that location has yielded.
-An FOS of 1.0 at a location indicates that the material at that location has just started to yield.
-An FOS larger than 1.0 at a location indicates that the material at that location has not yielded.

So, for the Plain old dropout, and a 1690N force, we get a FOS of: 5.25102
No problem. I would ride this all day.

The Von Mises stress distribution on the model look like this:


Lets repeat that test for the Fancy Cutout version:


Here our FOS is 4.43389 That's 15% less strength!

These pictures show the model in a total deformed state, though thats not actually the case for these applied forces. The dropout will NOT deform under these conditions. The program just uses this to illustrate how the stresses are distributed.

So what can we tell from this?

Well, its certainly more colourful. You can see where the stress is concentrated in this last picture. That lower crescent and the little arrow head appear to be areas of concern. It seems the cutout dropout is only 85% as strong as the solid one. Whether or not that is 'strong enough' is entirely subjective. Much like my opinion of the aesthetic design of this particular dropout.

I started playing around, finding the maximum force before the material would actually deform. It seems the solid dropout could withstand a force of 9kN or 2020lbs before it would yield.. and even then, just barely:


When that same force is applied to the cutout version, we see a couple more areas of deformation. Most notably is that little pointy arrowhead tip again:


I guess today I've learned that fancy cutouts aren't really as bad as I thought they were. I've also learned how easy it is for me to get sidetracked into theoretical testing and hypothesizing simply by staring at a picture of a bicycle for too long.

If any of this bicycle's designers are reading, please don't feel too slighted by my words. (I didn't even touch upon your PBR bike!) I am only doing this because I wish i was doing what you are doing.

Wednesday, October 15, 2008

Hill Bombs 1 and 2

I'm starting a project: Hill Bombs in Vancouver. Classified as "fun to ride on a BMX and challenging on the track bike". Changes in elevation and how to approach them. Possible explanations of timing or alternate routes. 

Feel free to email me your gmapped hillbombs and I'll throw them up in the set as long as they are worth riding. For round one of Hill Bombs I give you two that happen on my usual commute routes, and are therefore "Rocky and Stairmaster Approved". 


Through the very heart of FraBro. I start this one at 10th Ave on Fraser, as I give the commuters on the worst section of the bike route a glance. There's a concrete bus stop immediately east of Fraser on Broadway, and probably the most sketchy section due to the right turn. I often find myself shadowing cars turning right, or sometimes magically timing the light and watching for oncoming left turners. In any case, going pretty slow is smart, and an easier start to the bomb than trying to accelerate eastward across on Broadway.


Down the hill for four blocks, the safest line usually just right of the curb lane's left edge (concrete patches are abundant any further right). Watch for doors. 3p-6p this section is a bus/bike lane, with occasional rage commuters. If going fast enough, you can take the center lane, freewheel or fixed. And it always makes me thing of Zoobomb's Hellway going for the left lane late at night.

Two pedestrian-controlled intersections can slow you down but often are runnable. At the bottom of the bomb, Glen is the only vehicle-controlled intersection. It's right outside the VCC campus, and is a route from Great Northern Way to Broadway. This bomb has the option of finishing up with a grassbomb across the park into China Creek Skatepark - Vancouver's oldest bowl - which was fortunately spared in the park's current child-friendly refreshing.


2. Kingsway north from 10th (alternate Main from 10th).

When timed right, MainBomb is an extended high speed bomb - one of my favourites on BMX. It ends at sea level, so you know you're getting good value for your bomb. When starting this one, think of the 2006 Budgies skid comp. Once again we begin at 10th Ave, timing the light at Broadway. The merge on to Main is doable even on a red; keep right, next to the curb. Timing the rest of the bomb is part-magic, part-luck. 


After 6th Ave the grade increases noticeably. Again, left edge of curb lane is the default, though I find myself much more often downhill of 6th in the center lane going as fast as the cars. The possibility of door prize is high, as is the likelihood of cars coming off the side streets. Don't do this bomb when you're not at the top of your game - take Scotia instead; the 2nd Ave intersection at the bottom claims victims on a regular basis.

The bike route light at 5th also has cars, and can slow things down. But it's not too far down the hill to stop beforehand and time the 2nd Ave light if you do get caught up. Consider letting the articulated #3 bus pass and then go for a center lane bus-hop when it stops on the other side! Stopping for a burrito on the way down is also considered good form.


That's it for Hill Bombs round one. If you like it, leave a comment. If you have suggested content, shoot. While we may not have a train-serviced bomb, there are little nuggets of rad all over our city.

Sunday, October 12, 2008

Rack Attack Update

It looks like the Next Phase studios rack didn't hold up to NYC street life either:


Gothamist coverage here. No mention of Proj-B.

In other news, my rear wheel is once again true after a successful espresso procurement mission to the Bronx's little Italy.

..and my body sore after a day of BMXing New Jersey's street spots.

Kootenays ride report

In my last post the Sekine looked like this: fresh profile bar tape on 42cm ergo drops and a 90mm stem, with Tektro levers and "euro" brake setup. Cockpit adjustments are underway, after some riding on varied terrain.


The first test was one beyond the limits of most cyclocross wheels. Scaling the edges of the rocky east shore of Slocan lake, the main objective is to avoid pinch flats. I see this as punishment for my having dropped out of New Brighton on much less treacherous ground. "Diligent" is the necessary riding style, tire pressure somewhere less than the 65psi that comfortably took me to work and back two days prior. The sentinel, Beckham, adds another degree of unpredictability to the equation; he's fast, but likely to bolt into the woods at any point.


It's difficult to determine how a bike fits on jagged rocks. All I can say is that riding along the narrow trail, the vertigo-inducing rock bed on your side is not confidence inspiring.  With your brakes switched left-right, even less. I'm not exaggerating the intensity of this trail, which makes it all that much more amazing that my mom rode it on my aunt's Brodie in May. Getting back to the current ride, though, we made it into New Denver with only one poop-on-the-tire incident.

The purpose of this trip was to see Peter Roulston, who runs the Bicycle Hospital in town. During the summer, Peter opens for business two days a week, while taking appointments beyond that. He has a basic stock of Norco catalogue bits, bins full of odds and ends collected over the years, and a couple of used bikes ready for sale. 


Talking bikes with Peter is enjoyable, and he was intrigued by my franken-conversion. The unusual part I requested was a bottom bracket (or freewheel) spacer, but it turned out that a threaded equivalent was all he could provide. While probably a couple mm wider than I needed, the freewheel side of the spare KHS wheel had a ton of thread to spare.

After buying a tube and two bottom bracket lockrings from Peter, I headed back along the lake trail with spirits high. He had also told me about a route to seek out, up the next glacial valley to the south. I wonder if I'll find anything like this steep mining cart track, which I stopped to have a look at along the way home - in the past two decades, these tracks have gone from recognizable to almost-ruined. And on the devastation track, I lowered the tire pressure a few blasts and slammed a rock shortly after this photo was taken. While somehow avoiding the New Brighton pinch flat fate, a new gouge was added to the front rim.


Back at the house, I fired up a Bialetti and got to thinking about fitment again. The hoods do feel pretty far away. The answer to this question might end up being interrupter levers, as Lyle so aptly mentioned in his comment to the last post. The reason for this inclination is how much larger this bar setup is than my last comfortable setup on the same bike - 80mm stem and 39cm bars. That's 10mm of reach and 1.5cm of width on each side, plus the extended hoods of the wannabe-brifters. (This begs a measurement of the still-assembled Marinoni.) I haven't fitted a flat bar mountain bike in a while, but this is effectively simulated with interrupters and wide drops.


I bored my family with longwinded explanations about gear ratios while switching the rear tire to the second wheel and installing the 18 tooth freewheel. The bottom bracket lockring leaves lots of threads, and alleviates the spoke head interference which had prevented the freewheel's pre-trip installation. The bearings in this hub - quite possibly an original from Camilo's stolen-in-SF Flite 100 - are reassuringly better set than my other "race loose" wheel.


With 55psi in the tires, I headed north on the rail grade down to lake level, and had a Pilsner on the beach in Rosebery. Beckham's unpredictable gallop is bigger challenge when he's got gravity on his side; I was topping out the new 60" gear trying to stay ahead of him. There are a couple fun singletrack sections at lake level, where the trail diverts from the rail line temporarily. On the way back, I took the dog to school. I actually lost him. Apparently 40/18 is a good gear for climbing rail grade.


Changes are afoot. I took today off riding to do some work around the house, but also did some as-yet-undeclared adjustments on the bike. Tomorrow I plan to ascend a new valley, from the other town on the lake, Silverton.

Thursday, October 09, 2008

Halloween Race Trailer

I just stumbled upon this while checking out Vancouver happenings...


It may be the best race promo vid I've ever seen.
Possibly even better than last years!

..and HOLY SPONSORSHIP!!!

Morgan, Brandon, Nick... I expect you guys to bring home the goods!

"I watched the video, and I was scared."

While Morgan might not be able to get down with the Rubberband Man, T.I is definitely getting down with BMX. At 2:02, the posse takes over!

Wednesday, October 08, 2008

Overkill and Adequate

There are certain aspects of Lyle's mechanical tendencies that I have trouble avoiding; one of these is in a job done properly. I've just committed to cleaning and regreasing the chainring bolts on this bike. Why? Because they won't be tight enough if everything isn't put together fresh and clean; and, the setup will be that much easier to take apart next time.


Relating to Lyle's last post, bike fitment is another area that we at Project B are highly aware (and critical) of. I've just set up the Sekine in its second cyclocross iteration. After taking the bike to the New Brighton Cyclocross - fixed, 42/16, 40cm bullhorns, front brake only, rack and fender (see this is where we talk about the right tool for the job) - and not doing too badly until a pinch flat, I decided cross was worth pursuing. Thanks to Elaine and James for rad photos:


Here we are lined up at the start, Thunder in Your Heart still blasting through our heads I can guarantee you. I have the man Matt Barber and Team Mighty to thank for a loaner set of tires for the race.


...and after we were both taken out by mechanicals. Not Cru, but Luke, just missing the taco'd wheel. Send me an angel.


Back to the bike, though. Slightly slacker-than-road angles, tons of clearance, and a good quality frameset that fits; cue up the viable possibility of Sekineclocross, and my first crack at ergo bars. With a pair of Tektro aero levers won the night previous at the Eff Off Nikcee alleycat and the prospect of a parts bin build, a good day was spent with Projekt-Breakfast followed by bar scavenging, cabling, and taping.

Then a bunch of rowdy fools showed up at Wendell's weekly cyclocross clinic to tear ass around Jericho Park.


A 90mm Cinelli Frog and 42cm ergo drops are completely appropriate with the style of the build. While the hoods seem a bit far away at the moment, they're amazing for climbing. Oh, and the brakes are set up "euro" - for now, at least. I've always been fine with right-hand front brakes, but when there's a left lever, I generally default to left-front. Of course, this is an easy switch if I choose to do so, as the Profile splash tape has no adhesive.

Let's get back to why I'm changing the chainring on this bike. At the race, fixed 42/16 wasn't ideal - uphill switchbacks especially. Swapping to the 16 tooth freewheel also wasn't perfect. Off-road riding demands a shorter gear. I talked about getting a 17, until Mike hooked me up with a loud brassy 18 tooth freewheel (o hai, Mike at New Brighton). Next problem: the chain is going to be too short. Hence, the switch to 40 up front. Same number of teeth, 60 inch gear instead of 71. And the dropouts will happily allow a 17 and possibly the 16 as well. 

Thanksgiving 2006, I rode it from New Denver to Three Forks and back, getting my pants caught in the drivetrain in MKS Sylvans and tied down wine-red toe clip straps (what ever happened to those pedals, Dennis?). This year, I take the Sekine in another phase intending on the same destination, with a different route: The Galena Trail. The new gear should be great for the rail grade, but I'm bringing the spare with the 16 anyway.

Is there anyone who wouldn't be stoked on the trail after seeing this graphic?


This bike has seen many phases, possibly more than even the KHS did. Let's have a look back in the archives for some 2006 action. I remember Tim Wyatt busting my balls over the authenticity of the paint the first night I brought it out. Yes, it's still the original paint on Tange Champion 2, though I bent the original fork learning how to bunnyhop it. 


The Sekine is again hooked up. Matching wheelset, two rears with, eventually, four gearing options. Ergo bars and loud tape. Cleaned and greased chainring bolts. This weekend should provide plenty of uphill switchbacks to dial in the fit. The Sunday after that, October 19, is the Vanier Park Cyclocross. See you there.

Tuesday, October 07, 2008

The Right tool for the job.

An interesting blog comment arguement has been sparked over at bikeportland.org over the Jorg&Olif dutch bicycles.

For those that don't know, Jorg & Olif are a Canadian importer of Azor bikes. They're reasonably equipped, upright city bikes. Some people are balking at the price of a $1500 bike, that supposedly doesn't require maintenance, due to an internal hub, and fully enclosed chain. Well folks, nothing lasts forever. Not Rustproofed high tensile frames, not enclosed chains, Selle Royal Gel saddles, or stainless steel rims with 13 gauge spokes.

I could go on weighing the pros and cons of this bike against the price, but they did a pretty good job of it over on Bike Portland (all the specs are online too). All that being said. I want to ride one. For a month.

I imagine myself, (this time last year) hating my job and riding as hard as I could to get to and from it, in the worst conditions Vancouver could throw at me. Only, instead of using a tool I build myself for the job, I'm using a Jorg & Olif 3 speed OPA.

What would I break first?

I'm not fat. well, not too terribly fat. I think I'm hovering around 190lbs, which isn't unhealthy for my 6'1" frame. ..and I'm not a 'hack' rider either. I know how to flow a bike over difficult terrain. I just ride hard I guess.

The first thing to go would be something like a crank arm, pedal spindle, or lower headset cup. The thought of abusing one of these bicycles for my style of commuting has my face in a bit of a grin. Lets see what I have done in the last month to my Spicer:

Bars: Nitto RB019s are inexplicably bent DOWN on the left side only. I can only imagine this was from absorbing an impact while out of the saddle

Crank: Right Shimano 600 crank bent from a Jersey barrier impact when I miscalculated the gap on the right side of a stationary taxi

Rear Wheel (32h Ambrosio Excellence to high flange hub): I've had to true it about 2x now this past month. I'm trying to keep the tension around the wheel as linear as possible from spoke to spoke, but I'm compensating for S bends now, and its only going to get worse. Every hard stop I have to be careful to weight it correctly, or it will just detune itself, and I'll have to start again on the TS-2.

I'm not really sure how the Azor would fair in place of my current steed.

That being said, there is a right tool for every job. And a wrong one. And one that will work 'well enough'. The other night at Ratpack I saw someone flipping their wheel and using a crescent wrench on their 15mm track nuts. That made me cringe.

Strangely, I don't get that 'wrong tool' feeling when I see stuff like this:

Photo of Jeremiah at Peel sessions courtesy of sexysushi on flickr

Its not the 'wrong tool' so much as it is not the 'best' tool. And for some reason I'm glad it exists. It would be boring if EVERYONE who rode track bikes was interested in only perfecting their spin. There's got to be variation.

Like this monster for example:

Olli Erkkila has just unveiled his new 'winter fixie'. It is indeed the right tool for the job. If the job is happily spinning along over Finland's frozen tundra.. which it is. Bikes like this make me extremely happy. The owner made it for one purpose. You can bet he's out there right now, testing it in the 'wrong' conditions too.

Saturday, October 04, 2008

el presidente

yes, i'm the new bvc president.

no, i can't get you a free membership.

rock on, then.

Thursday, October 02, 2008

Failure mode analysis


Fig. A: Kryptonite Evolution key comparison after approx. 50,000 wear cycles.

Aint nobody cooler


CLP - Ain't Nobody Cooler (Video edit) - BNR27 from CLP - Chris de Luca vs Phon.o on Vimeo.

Rack Attack

Sometimes things bug me enough that I just have to do something about it. Last night I was linked to the NY City racks design competition finalists. Curiosity got the better of me and I downloaded all of the PDFs to study. I was actually angered by some of them. (take a look at them before reading on)

I lie there awake in bed. Wishing I had known about this contest back in March. Wishing I had registered on the site to post comments... Then it dawned on me. I was going to get up early and BLOG ABOUT THEM!

The contestants:

Andrew Lang and Harry Dobbs

This one looked promising from the renderings, just a variation on the classic U rack, which is pretty decent. They have also branded this one by taking the classic I <3 NY (tm) logo and making it I Rack NY.. Not sure what that means

Baroni Valeriani architetti

This one pissed me off. A classic wheelbender. Vancouver has some Less stylized spiral racks like this, only taller, and made of one continuous steel tube. Their downfall is that the bike is constantly leaning. Needless to say I wasn't optimistic about this design.

Ian Mahaffy and Maarten De Greeve

This one looked okay. Nothing to outstanding, though it looked like it would be made of cast iron, which I liked.

Federico Otero

Immediately I was curious about the anchoring of this design. Why would the two pieces not be joined by a common plate?

Francis Anthony Bitonti (FADArch)

This one bothered me, in that way that most abstract art bothers me. The PDF shows a billion different configurations, all ugly and cumbersome.

Ignacio Ciocchini


This one reminded me of Toronto's ill fated loop racks on parking meters. The ones that can be defeated by a good length wooden 2x4.

Jeff Miller and Andrea Ruggiero

Just looking at the initial JPG of this one, I didn't like it. The 'I Bike NY' logo plate (meant to display advertisements) is actually shown GETTING IN THE WAY OF THE PEDAL

Next Phase Studios


Cable rack? Surely you are joking. The cable lock doesn't get invited to party with the U locks or case hardened chains. Also worth lolling is the render showing a cable lock going through the FRONT WHEEL.

Stephan Jaklitsch Architects PC

For some reason, this one pissed me off the most. Perhaps its because it had the word 'Architects' in the title. Or maybe because the renderings made it look like the aluminum was too thick to get a U lock around properly.

Open Thread Design


Initially I liked this one the best. Sort of. His proposal shows a special sign post, that has a kink in it, and the top part flattened. I thought this was brilliant. Cyclists are already locking to poles, so why not just make the poles better? He also shows a similarly shaped corral to go along with it. Which looked suitable for up to 4 bikes.

On to the competition.

I got up at 6am, slammed back a Bialetti full of Mexico's finest, threw some fresh batteries in my camera and headed south on Broadway towards Astor Place. After a sleepy hoon through Times and Union square, I arrived, ready to lock up my bike.

My criteria was whether or not I could lock my bike to the rack by two U locks at once. I think that is the absolute minimum for anyone who works downtown and wants to keep their bicycle. One U lock goes around the front wheel and frame, and the other goes around the rear wheel and frame. The city's 4700 upside down U racks do this just fine.
Being the weight weenie that I am, I didn't actually bring both U locks with me. I only brought one, and tried locking in both positions without moving the bike.

The results:

Andrew Lang and Harry Dobbs
PASS. Strangely, someone had spilled a bunch of dogfood at the base of this rack. I was able to lock it with 2 ulocks without moving the bike.


Baroni Valeriani architetti.

Fail. What is this, a rack for ants!?


Ian Mahaffy and Maarten De Greeve

Pass.
I liked this one. Very sturdy, and it looked like they had to dig up a good chunk of concrete to bury the base. It passed the two U lock test.


Federico Otero
Federico Otero is an up and coming designer from Latin America. He gives a new face to design by creating products that update traditional and artisanal techniques, transforming them into unique modern forms. His contributions to design include a wide spectrum that ranges from jewelry, faucets blah blah blah..
FAIL.
I leaned my bike against this rack and noted how flimsy it was. I then pushed on it with one hand and it broke. I decided to throw it in the garbage, so no one would try to lock anything else to it.


Francis Anthony Bitonti (FADArch)
Sadly I couldn't find this one at Astor place. You wouldn't think it would be so hard to miss. I am doubting it would pass my criteria.
Here's a photo from the Gothamist:

I can lock tarckbike?


Ignacio Ciocchini


Tentative Pass. It looks okay and fit both locks. I didn't have a 2x4 handy though.


Jeff Miller and Andrea Ruggiero

Even without the advertising plate, this one failed. The dimensions just didn't work with my bike, and my crank hit the base, preventing me from getting the bike in closer. It was already rusting too.


Next Phase Studios

Fail. I couldn't get two Ulocks on it. I think it may turn yellow over time, there's a lot of space in between the plastic sheath and the actual cable. The good thing was that you cannot work this design loose by rocking it back and forth. The whole thing flexes.


Stephan Jaklitsch Architects PC

DAMMIT. PASS! I can't believe it! The one I was hating on the most last night was GREAT! Its the perfect size, appears to be anchored securely, and even holds the bike on the right angle! Truly a nice rack.


Open Thread Design

Fail. I couldn't get my top tube under the bar here to get my seat tube/wheel secured. Perhaps if there weren't already 2 bikes on it. Though, its probably meant to hold 4. Sadly, they didn't install the Signpost version of this rack. I had such high hopes for this one.

Well.. That concludes my early morning rack attack. Which basically proves you cannot judge a rack by its render.. or some other joke involving the word 'rack'.

The full flickr set is HERE. Now I've just got to mail my findings to David Byrne and I can get on with my day.